How to Use the Tool Blocks

Overview
In this guide, we'll walk you through the various tools available to enhance your content creation. Whether you're looking to work with text, images, interactive activities, or media, we've got you covered. You'll also learn how to incorporate quizzes, accordion-style content, and harness the power of the AI Assistant for dynamic interactions. By the end of this tutorial, you'll be ready to create engaging, interactive experiences for your audience with ease.

Step Tutorial
Here are the tools and blocks available for editing:
A. Text
Add text to your course content by clicking on the 'Text' block. Hover over the 'Text' tool to display the different text block types and formats.
Content Padding Settings
Click the 'cog' icon to display the padding settings modal. This will allow you to customise the padding settings at the course level and reset to default if needed.NOTE: When the course's theme is updated, the default padding settings of the new theme will be automatically applied to the text contents of the course.
Columns
- Single Column — Add text in a single-column format.
- Two Columns — Add text in a two-column format.
- Three Columns — Add text in a three-column format.
Heading and Paragraph
- Heading with Paragraph — Add a content block with both a heading and a paragraph placeholder text.
- Heading Only — Add a content block with a heading placeholder text.
- Paragraph Only — Add a content block with a paragraph placeholder text.
Toolbar
After adding a text widget, you can format the text by selecting the portion of the text you want to modify. This action will open the 'Toolbar'.
a. Undo/Redo — Click the 'undo' arrow to reverse the last action performed, restoring the text to its state before the action. Alternatively, click the 'redo' arrow to reapply an action that was previously undone, restoring the text to a state after the undo action.b. Font Size — Click this to adjust the measurement of the text from the baseline to the top of the tallest character in a line of text.c. Font Style — Click this to change the typeface of the texts.d. Headings — Click this to set the text format for the headings to emphasise hierarchy.e. Image — Click this to insert an image at the cursor's position within the text content. This opens the existing 'Upload Image' modal with the same upload options as when adding an image through the 'Image' menu.
- The size of the uploaded images here will be constrained if it exceeds the container's width. When scaling the image to fit the container, the height will be adjusted proportionally to preserve the aspect ratio.
- Images uploaded here are automatically included in the local image library under 'Uncategorised', and you will be able to change their category in the local image library modal.
f. Link — Click this to add a link to the selected text. It allows you to link to a webpage, file, or email address, making the text clickable for easy navigation.g. Line Height — Click this to adjust the spacing between lines of text. Select 1.0 for single spacing, 1.5 for one-and-a-half spacing, or 2.0 for double spacing to apply it to the highlighted text.h. Indention — Click this to adjust the horizontal space between the text and the left or right margin. It is used to create visual hierarchy and structure within a document, such as in lists or paragraphs.i. Font & Background Colour — Click this to specify the colour of the text characters or background.NOTE:
- You can open the custom colour modal to choose a colour from the palette or manually enter a colour code and apply it to the selected text.
- You can use the colour picker to select a colour anywhere from the screen and apply it to the selected text.
j. Font Emphasis — Click this to alter the appearance or style of text (bold, italic, underline, strikethrough, superscript and subscript).k. Alignment — Click this to determine the positioning of the text (left, centre, right and justified) within a text box.l. Text Case — Click this to transform the selected text into 'UPPERCASE', 'lowercase', or 'Title Case' formatting.m. Bullets — Click this to create a list of items where each item is preceded by a bullet symbol or a similar marker. Bullets help organise information into a readable and structured format.n. Table — Click this to add a table to your content. You can add an entire table with a specified number of rows and columns, or you can simply add an individual cell, row or column to your existing table. Tables are used to organise and present data, making it easier to read, compare, and analyse information.o. AI Text Assistant — Click this to reveal the AI text assistant options to enhance your course content and add more details.
- Expand Text — AI text assistant can extend or elaborate on existing text by adding more details, examples, or explanations. This helps in providing a more comprehensive understanding of the topic or idea.
- Bullet Point Text — AI text assistant can format text into bullet points, organising information into concise and easily digestible points. This is useful for presenting key ideas, lists, or steps in a structured manner.
- Summarise Text — AI text assistant can condense longer passages of text into shorter summaries while retaining the main points and essential information. This is helpful for quickly understanding the core ideas of a document or article without reading through all the details.
NOTE:
- When the user clicks 'Apply', the selected text will be replaced with the AI-generated result.
- When the user clicks 'Regenerate', the prompt will be rerun to produce a new AI-generated result. Unlimited regeneration is allowed.
- Text to Speech — AI text assistant can convert written text into spoken words using artificial intelligence. It enables users to listen to written content, making information more accessible and engaging.
B. Image
Add images to your course content by clicking on the 'Image' block. Hover over the 'Image' tool to display the different image block types and formats.
- Single Column — Add image in a single-column format.
- Two Columns — Add image in a two-column format.
- Content Banner — Add content banner manually.
When you select 'Content Banner', a new content banner will be added to your course, displaying the default text 'Content Banner', which can be edited by clicking on the 'cog' icon.
When the 'Upload Image' button is clicked, a modal will appear with three options, similar to the standard image upload feature.
For 'Upload Icon from this Device', you will be able to upload icons from your local device by dropping the file in the box or by clicking the box on the modal.For 'Browse Free Icon Library', you will now be able to search the free icon library to personalise the manually added content banners.For 'Use Default Icons', you will be able to choose from the default icons.
- Call to Action Button — Add button with embedded link.
Under this option, three layout sub-options are available: 'Single Column', 'Two Columns' and 'Three Columns'.
When selected, a new content block displaying CTA buttons styled according to the course's theme will be inserted.
'Change to Default' and 'Settings' options have also been added alongside the CTA button, allowing users to customise the button and insert a link to define its redirection.
In the Course Preview, the CTA button will be displayed based on the settings defined by the user.
Position
Both single-column and two-column image formats offer a variety of options for positioning images and text together.
a. Image Only
This format consists solely of an image without any accompanying text.b. Image Above Text
In this format, the image is positioned at the top of the text content. The text appears below the image.
c. Image Below Text
Here, the image is placed at the bottom of the text content. The text appears above the image.d. Image Left of Text
In this layout, the image is aligned to the left side of the text. The text flows beside or around the image on its right side.NOTE: You can align the text part vertically to the top, middle, or bottom from the TinyMCE toolbar.e. Image Right of Text
This format positions the image to the right side of the text. The text flows beside or around the image on its left side.NOTE: You can align the text part vertically to the top, middle, or bottom from the TinyMCE toolbar.f. Text on Image
In this format, the text is overlaid directly onto the image itself. You can adjust the text font size and move it anywhere within the image.The 'Text on Image' option includes two buttons—(a) one to position the text box and (b) another to open the settings window. The settings window allows you to set the 'Overlay Background Colour', 'Opacity' level, and 'Text Box Alignment'.
Add
i. Click the 'Add Image' button.
ii. Next, a modal will appear, allowing you to upload an image from your local files, browse your local image library, generate an image using AI, or browse a free image library and add it to your course.
a. Upload Image from this DeviceThis option allows you to select and upload an image file that is stored on your computer or device. By choosing this, you can upload images by either dropping the file into the box or clicking the box to open your device's file explorer to select an image.
b. Browse Local Image LibraryThis option allows you to reuse previously uploaded images in the course builder. Regardless of how they were added (e.g. from a device, generated via AI and from free image library), these images will be added to the local image library.All existing categories, including 'Uncategorised' images, will be available in the drop-down menu. You can also search via image name/description.
When a category is selected from the drop-down menu and the 'Search' button is clicked, the images within that category will be displayed.
i. Clicking the 'settings' icon will open the modal for configuring the 'Image Category', 'Name' and 'Description'.
ii. Clicking the 'plus' icon will add the selected image to the course builder.
c. Generate Image via AI
This option allows you to create a new image using AI tools based on specific parameters or descriptions you provide.
To generate an AI image, follow these steps:
- Select the preferred 'Image Type'. The drop-down menu offers a variety of options to match the learning intent of the AI-generated image. To help you decide which type and style to use, access the 'Educational Image and Visual Style Catalogue' by clicking the helper '?' icon.
- Select the preferred 'Image Layout': 'Square', 'Portrait' or 'Landscape'.
- Select the 'Country' of reference for the image. Any places, people and objects will be contextualised to the chosen country. This setting is applicable regardless of image type.
- The drop-down menus for 'Image Type' and 'Image Style' will be disabled since the detailed 'Image Description' is intended for the current selection.
- If the user needs to change the 'Image Type' and 'Image Style', they need to cancel the generated image and create another.
- Click 'Regenerate AI Image' if you are not satisfied with the image result or want to apply changes based on your edited image prompt.
- Click 'Use Image' to insert the generated image in the course content.
d. Browse FREE Image Library
This option allows you to search and view images available on the internet. Use it to find and select images from free online image repositories and add it to your course.1. Upon clicking 'Browse FREE Image Library', a modal will open, allowing you to select an online image repository (Pexels/Unsplash) and search for the images you want to add.
2. Once you have selected a repository and searched for an image, click the '+' button to add the image to your course.
Buttons
a. Edit with AI
i. Select the 'Edit with AI' button to modify images in the course.
ii. Describe your desired edit in the AI modal that will appear. Click 'Generate AI Image' to see the regenerated image based on your prompt.NOTE:
- Edited images via AI will be deducted from the user's free monthly AI image allocation.
- When the allocation for free monthly AI images is exhausted, they will be deducted from generation credits.
- For free trials, one free AI generation is allowed.
b. Categorise
i. Every image uploaded to the course builder will have a setting for image categorisation, which helps organise your images for future use.
ii. When you click on the 'Image Settings' button, a new modal will appear, allowing you to set the 'Image Category', 'Name' and 'Description'.
NOTE:
- You can either add a new category or select an existing one (if you have already assigned a category to other images).
- Images that do not have a set category will be placed under 'Uncategorised'.
- You can also add a single line description for that image.
c. Replace
d. Crop
i. You can freely crop any images added in your course content by clicking on the 'Crop Image' button.
ii. Clicking the 'Undo Crop' button will reset the crop box to match the image's original dimension.
e. Image Corner
- The 'Image Corner' button on the image controls the corner styling of each image, while the 'Image Corner' settings found in the 'Image Settings' modal control the corner styling of the whole image content block.
- When you change the theme of your course, the updated theme settings for image corners will be applied.
Click on the 'Image Corner' button to switch between square or rounded image corners style at the course level per image.
NOTE:
f. Resize
i. Scale your image to a fixed dimension by dragging the 'resize' icon in the lower right corner of the existing image.
ii. Click on the 'resize' button to display the options for resizing uploaded image.
NOTE: The uploaded image will follow the specified width (as shown in the table below), but the height will be scaled proportionally to maintain the aspect ratio.
|
|
| 320 |
Medium | 640 |
|
|
|
|
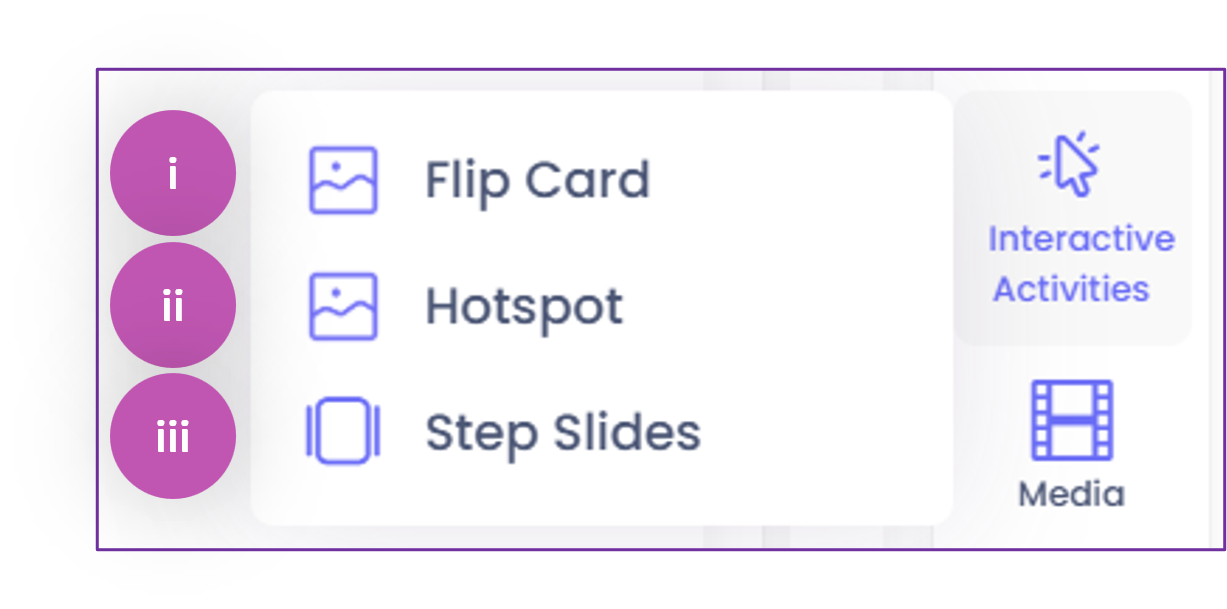
C. Interactive Activities
Add engaging activities such as 'Flip Card', 'Hotspot', and 'Step Slides' blocks to enhance participation and learning.
Flip Card
It involves cards that can be flipped to reveal different information on each side.
- Flip Card has 'Single Column', 'Two Columns' and 'Three Columns' options.
- Flip Cards will have two sections: 'Front' and 'Back' for 'Image', 'Text' or 'Text on Image' inputs. To change the content type, click the drop-down menu in the upper right corner of each section.
- You may also customise the background colour for the flip card text content.
NOTE:
- By default, the front side of the flip card will display 'Text on Image', while the back side will show 'Text'.
- When you customise the flip card settings (e.g. changing the image or font), their changes stay intact and are not affected by the course theme.
- If you choose to use the default image and text, the flip card settings will update to match the new theme when the course theme is changed.
- If you change a course's theme, any default flip cards will update to match the new theme's settings. However, any customisations made in the course builder, like changing the image or font styling, will stay the same and won't be overridden.
- The instructions for users on how to interact with the flip cards are editable.
Hotspot
It involves points or areas on the image that pop up as a small window containing text when clicked.
- Hotspot has 'Single Column', 'Two Columns' and 'Three Columns' options.
- Click the 'cog' icon to customise the 'Hotspot Settings', and the changes will apply to all hotspots in that content block.
- Users will be able to upload an image that will serve as the base for the hotspot activity.
- Once an image is uploaded, users will be able to add, move or delete a draggable icon on the image that will serve as a hotspot.
- To add another hotspot, simply click on the '+' button. A text input field is available for each hotspot, allowing users to add descriptive text or instructions related to it.
- To edit the text, simply click the 'pencil' icon and the 'Edit Hotspot' modal will open. This modal contains a colour picker for the 'Background Colour', a text input field, a 'Hotspot Icon (Optional)' settings, as well as a 'Hotspot Sequence Number'.
NOTE:
- If you upload a hotspot icon here, the changes will apply only to that specific hotspot.
- The current sequence number of the selected hotspot is highlighted in blue for better visibility. When a user chooses to change the sequence number of a hotspot, the new sequence number will be highlighted in blue, while the original one will appear in grey.
- Upon clicking 'Apply', the sequence numbers and overlays of the two hotspots will be swapped accordingly.
- The instructions for users on how to interact with hotspots are also editable.
Step Slides
It involves successive slides that break down an entire process or list for easier comprehension.
- At the bottom of the Step Slides, an ‘Add Another Step’ option is available. Selecting this will insert an additional slide.
- In Course Preview, the user can browse through the slides by either clicking the ‘Previous’ and ‘Next’ buttons or selecting a pagination dot that corresponds to a specific step.
D. Media
Add audio or embed a video in your course by using the 'Media' block. Hover over the 'Media' tool to display the different media block types and formats.
Video Only
This media type allows users to embed videos into the course without requiring any additional text.
There are three options to add a video:
a. Upload Video from this Device
Select to upload videos from your device.
b. Embed Video from YouTube or Vimeo
Select to embed videos from YouTube or Vimeo.
c. Browse Local Video Library
Select to choose videos from your local library.
NOTE:
- In this modal, you are allowed to browse previously uploaded videos.
- A category drop-down filter is available, including the 'Uncategorised' videos.
- In the same modal, you can search and assign/update a video's category, name, and description.
- Selecting a video from the local library and clicking '+' adds it to the course.
When you upload a video from your device or embed videos from YouTube or Vimeo, a 'cog' icon and a 'Replace Video' button will appear at the bottom of the uploaded video.
- Clicking the 'cog' icon opens a modal that allows you to assign a 'Video Category', 'Name', and 'Description'.
NOTE:
- All uploaded videos will be added to the local video library. Videos without an assigned category will default under 'Uncategorised' category.
- Deleting a video from a course removes it only from that course and does not delete the video file if it is used in other courses.
- If a video is removed from a course and is not being used in any other course, it will also be deleted from the local library.
- Clicking the 'Replace Video' button allows you to change the added video file.
Video on Top
This media format allows users to embed a video into the course and add additional text below it. Uploading or embedding a video follows the same steps mentioned above. To edit the text, simply select the text box and replace the existing text. Use the text tool bar to format the text.Video on Bottom
This media format allows users to embed a video into the course and add additional text above it. Uploading or embedding a video follows the same steps mentioned above. To edit the text, simply select the text box and replace the existing text. Use the text tool bar to format the text.Audio Only
This media type allows users to add audio into the course without requiring any additional text. Select 'Upload Audio' to upload an audio file from your local files.The audio file will be displayed. To change the audio file that you uploaded, click 'Replace Audio'.Audio on Top
This media format allows users to add an audio file into the course and add additional text below it. Uploading or embedding an audio follows the same steps mentioned above. To edit the text, simply select the text box and replace the existing text. Use the text tool bar to format the text.Audio on Bottom
This media format allows users to add an audio file into the course and add additional text above it. Uploading or embedding an audio follows the same steps mentioned above. To edit the text, simply select the text box and replace the existing text. Use the text tool bar to format the text.
Document Viewer
This option allows users to view and interact with digital documents directly within your AICC course. You can upload a PowerPoint (PPT) presentation or a Portable Document Format (PDF) file to the Document Viewer.
When a file is selected, an icon will be displayed (PPT or PDF) together with the filename.
NOTE: You will be notified if the file you are trying to upload is protected.
On Course Preview page, Document Viewer content will be displayed as follows:
E. Quiz
Use the 'Quiz' tool to create assessments.
NOTE: It is important to click 'Save' after adding the Quiz block. This will allow the user to add questions to the quiz.
After saving the course, the 'Add Questions' button should be available.
There are two ways to add a quiz:
Add New Question
This allows users to choose among different question types: Multiple Choice, True or False, Matching, and Fill in the Blank.
In this example, let's create a True or False question.
i. Click 'Add New Question'.ii. Choose a question type.After choosing a question type, a new question will be added.
iii. Input your question and provide the correct answer. You can also add an image using the 'Insert Image' tool, which is included in the TinyMCE toolbar within the quiz content block.
iv. Once finished, click 'Save'.
Add Existing QuestionThis enables users to retrieve questions from previously created courses. To add an existing question, click the 'Add Existing Question'
button, then use the filters to search for an existing course.
In this tutorial, let's use a question from the 'BSBCRT411 - Apply Critical Thinking To Work Practices' course. This course is under the category 'Business' and the question should be from the topic 'Identify Critical Thinking Concepts'. Set up each filter by selecting an option from the drop-down menu to refine your search. Then, click 'Search'.
i. Choose a question to add,ii. Click 'Confirm'.
iii. A prompt message will appear that your question was successfully added. Click 'OK' to continue editing your questions.
iv. Continue repeating the steps mentioned earlier until you have finished setting up your quiz.
Require Quiz Attempt for Course CompletionIf the toggle is switched on for a specific quiz in the course level, that quiz will be excluded from the completion percentage and the course will not reach 100% unless that specific quiz was attempted.
F. Accordion
Format the text to present individual items sequentially or to contrast various ideas in a clear, user-friendly layout.
a and b — Use the 'up' or 'down' icon to rearrange the tab sequence.c — Click the 'Text' button to add a text block to the current tab.d — Click the 'Image' button to add an image to the current tab.e — Click the 'Media' button to add video or audio to the current tab.f — Click the 'trash bin' icon to delete the current tab.
g — Rename the text to add a label to the current tab.
h — Click the 'Add Accordion' button below the last tab to insert a new accordion within the content block.
G. AI Assistant
Utilise AI to generate content, practical example, case study, or scenario. Hover over the 'AI Assistant' tool to display the different AI options.
Generate Learning Objectives
You can now add learning objectives to courses you have already created or include them if you forgot to enable the toggle during setup, without regenerating the entire course. This will appear on both topics and subtopics. When clicked, it works like the 'Learning Objectives' toggle in the course wizard, creating learning objectives for the whole course and adding them as a separate topic at the start.
Generate Content
This tool appears and creates an entire content when you have a topic or subtopic with no content.
Generate Quiz
This tool appears and creates a quiz when a subtopic has content but no quiz.Upon clicking 'Generate Quiz', the following options will be displayed:
- Cover All Subtopics in the Topic — This option creates a quiz that includes questions from every subtopic within the selected topic, ensuring comprehensive coverage of the material.
- Cover Subtopic Only — This option generates a quiz focused exclusively on the chosen subtopic, allowing for targeted assessment of that specific area.
- Cover Entire Course — This option produces a quiz that encompasses questions from all topics and subtopics throughout the entire course, providing a broad assessment of overall knowledge.
NOTE: The 'Generate Quiz' option will not be displayed for the following scenarios:
- If 'No Quiz' is selected in Quiz Settings
- If a subtopic already has a quiz
- If a subtopic has no content yet
- If working on a topic ('Generate Quiz' will be available for subtopics only.)
Generate Practical ExampleThis tool creates a general practical example that will: (1) cover the entire topic and subtopic, or (2) cover the current topic only.Generate Case Study
This tool creates a case study that will: (1) cover the entire topic and subtopic, or (2) cover the current topic only.Generate Scenario
This tool creates a scenario that will: (1) cover the entire topic and subtopic, or (2) cover the current topic only.Generate Image
This tool functions the same as 'Text to Image', only that the generated image will be added at the end of the topic/subtopic, positioned before the quiz if there's any.NOTE:
- Images generated through both the 'AI Text Assistant' and 'AI Assistant' tools are counted towards the client’s monthly free image generation inclusion and the free image generation during free trials.
- Generated images from the 'Text to Image' and 'Generate Image' options will automatically be added to the local image library, under the 'Uncategorised' category, after saving them.
Text to Speech
This tool allows the user to convert text content into audio blocks that will: (1) cover the entire topic and subtopic, (2) cover the current topic only, or (3) cover the entire course. The audio block will be added above each text block on the relevant topic or subtopic.Upon clicking 'Text to Speech' and selecting a submenu, a modal will appear allowing users to select a 'Language' and 'Voice' to be used. This modal will also show the number of tokens required for the text-to-speech conversion.
Once the preferred 'Language' and 'Voice' are set, the following buttons will become active:
- Sample Audio — This option plays a sample audio provided for each voice available on the modal.
- Convert — This option proceeds to the text-to-speech conversion.
NOTE:
- Selected 'Language' and 'Voice' settings when converting text to speech for the first time is automatically applied when using the text-to-speech feature again.
- When converting text from accordions to audio, all the content from the different accordion tabs will be merged into a single audio file.
- If a text block exceeds 8,000 characters, the audio will be divided into two or more equal parts at a natural cutoff point within the text.
- A full stop will be added automatically to each heading, allowing the converted audio to speak clearly.
- Images, other audios, videos and quizzes will be excluded from the text-to-speech conversion.
- For text contents that has tables, a line is added to the converted audio wherein it introduces the columns and data in each row.
- 'This table has the following columns [then each column is read].'
- 'Row data is [then data on each row is read].'
These lines when introducing a table are also available on all the supported languages in the AICC.
After choosing an option, a prompt message will ask for confirmation. Below is a sample for your reference. Then, choose 'No' to cancel or 'Yes' to add AI-generated content.
Save your changes using the 'Save' button to complete the editing process. Once finished, you can preview your course using the 'Preview' button.
Related Articles
How to Edit the Course Blocks
Overview Whether you've used AI to generate your course content or created it manually, you have the flexibility to add, rearrange, edit, duplicate or delete the course blocks to suit your needs. This customisation allows you to refine the structure ...How to Edit a Course
Overview In this guide, we will walk you through the steps to personalise and enhance your course. You’ll learn how to edit your course cover page; modify and rearrange course blocks; and effectively use the course tool blocks to add text, media, ...How to Edit a Theme
Overview AI Course Creator offers a wide variety of themes, you can utilise these pre-loaded themes to enhance your course's appearance or modify them to best suit your preference. In this tutorial, we will discuss how to edit a theme. Step Tutorial ...How to Share Courses to Your Moodle or eSkilled LMS Using LTI 1.3
Overview In this article, we'll discuss the use of LTI 1.3 for easily sharing your AI-generated courses to your LMS. To easily follow the process, we'll break this into different parts. If you use Moodle LMS, including eSkilled's Moodle LMS, this is ...How to Share Courses to Your Moodle or eSkilled LMS Using LTI 1.1
Overview In this article, we'll discuss the use of LTI 1.1 for easily sharing your AI-generated courses to your LMS. To easily follow the process, we'll break this into different parts. If you use Moodle LMS, including eSkilled's Moodle LMS, we ...